
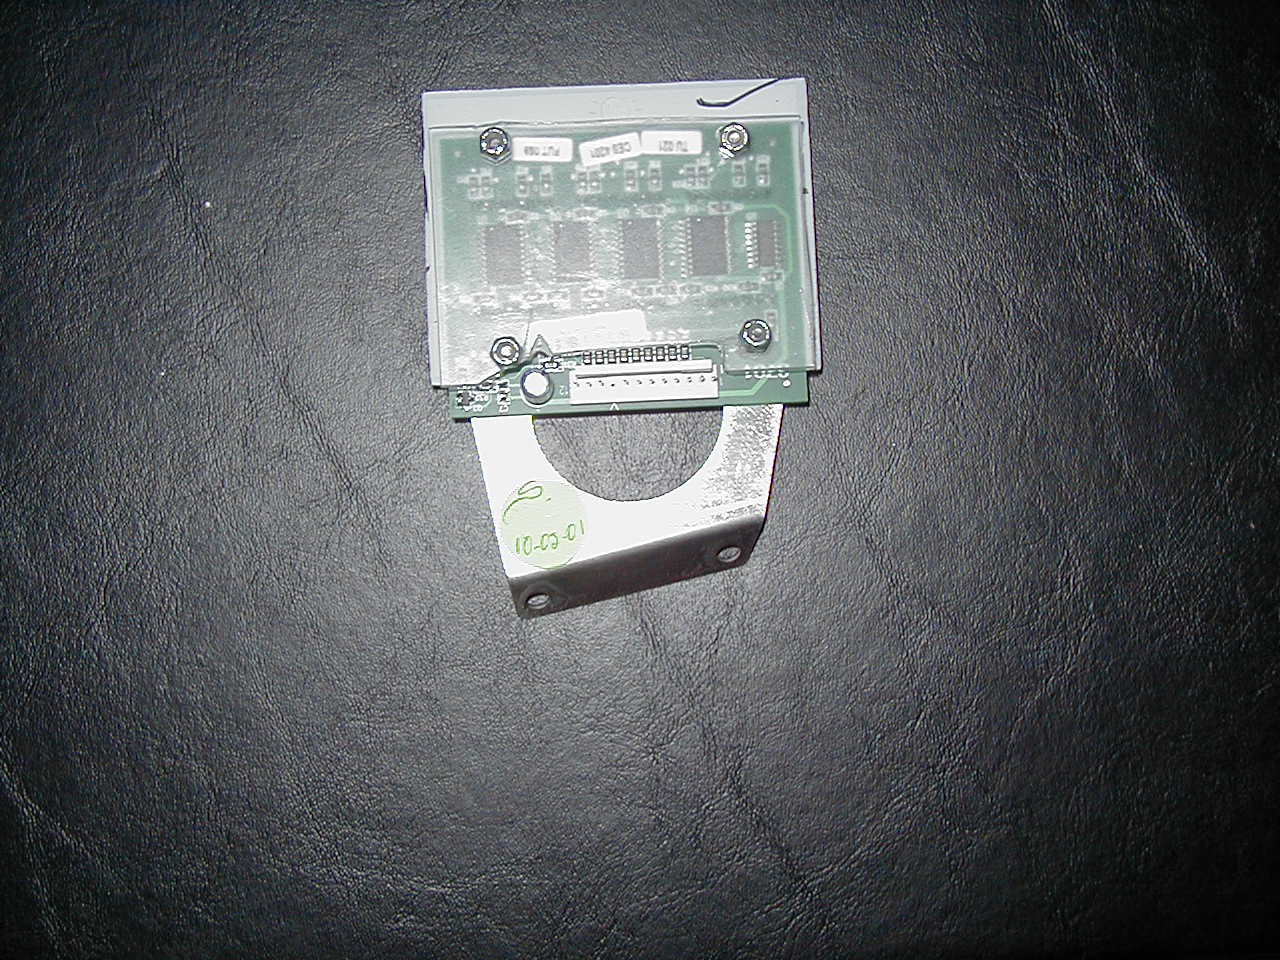
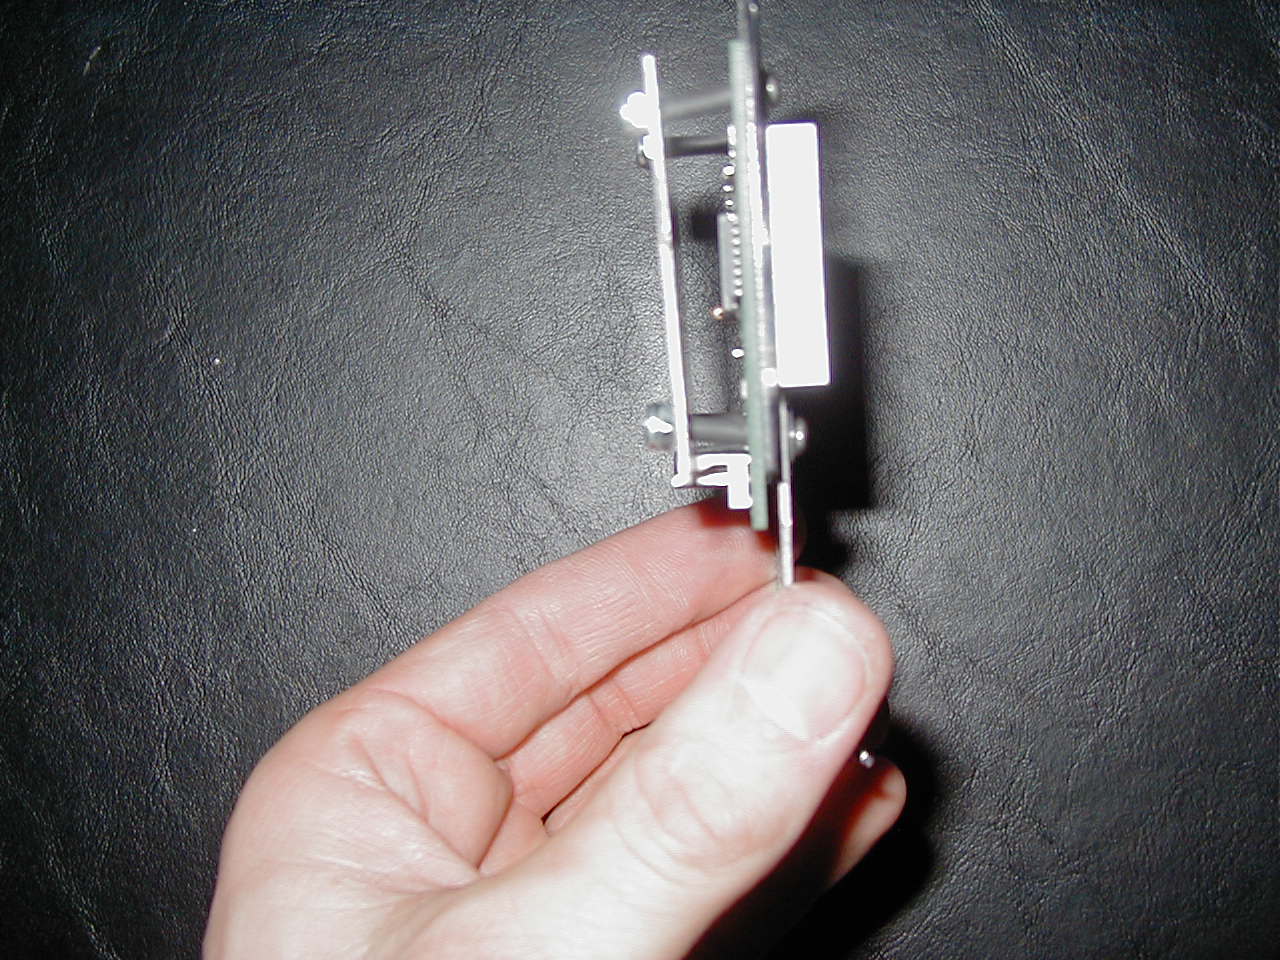
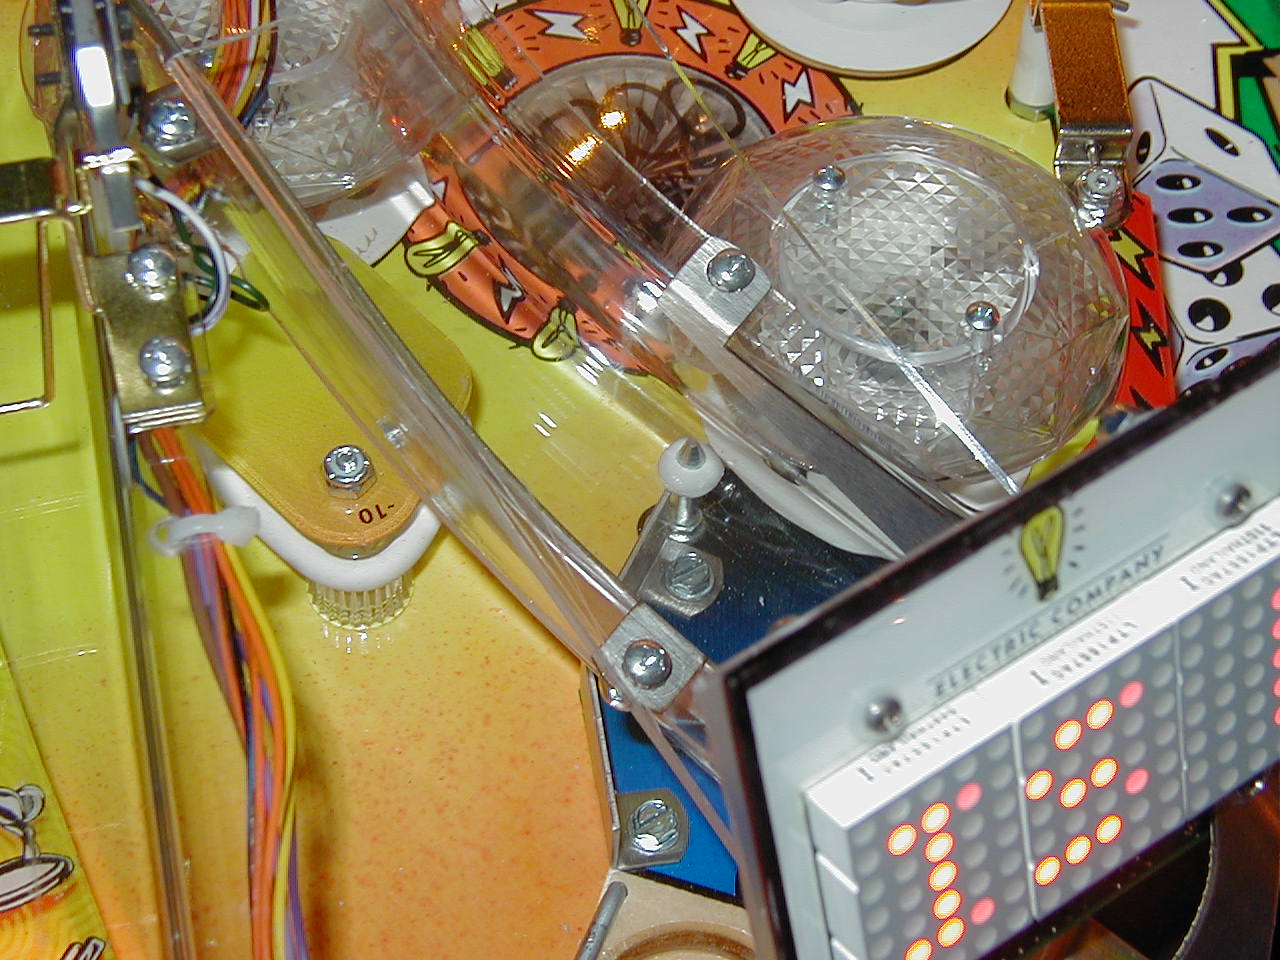
Electric Company Shield
History
I was playing a game of Monopoly. I shot the ball up the Free Parking ramp and the ball hit the yellow standup post (next to the Free Parking sign) and bounced off and hit the back of the Electric Company sign. Just after this happened, the Electric Company sign started showing random patterns and the left LED panel was completely out. Originally, Stern and I thought it was the sign that took the damage, so I received a new Electric Company sign from Joe Blackwell (as a side note, he is a great guy to work with.) Well, the next sign looked the same. I then talked to another great guy at Stern (Chaz) and he said that if it was not the sign then it must be the power driver board. Well, that did the trick.
While I was waiting for my power driver board to arrive I came up with this fix. It looks and works great. It might have been a fluke that it happened, but I am not taking the chance again.
Here are three pictures that show you what I did.
Materials
New screws that are approx. twice as long as the originals. I used the same nuts.
Black heat shrink to help separate the lexan from the screws.
I piece of Lexan cut to size. I can measure the piece if anyone is interested in applying this fix.
That's it!
Please let me know what you think.
Dennis
Free Parking Ramp Shield
Well, I finally got tired of the ball flying up the ramp to just hit the middle of the Free Parking sign and NOT awarding me Free Parking. Here is a quick fix with Lexan. Let me know what you think!
Dennis
Eliminate Backbox Hum and Buzz
(Compliments of Mike Schudel)
First of all, any
modifications you do to
your game and CPU/Sound board, you do at your own risk.
Performing this procedure requires removing the CPU/Sound board
and some
basic soldering. If you don’t
feel comfortable doing this yourself, either leave it alone or have a
qualified
electronics technician perform the fix for you.
I take no responsibility for damaged boards or personal injury.
Now with that out of
the way!
When I first received
my NIB Monopoly and
finally got it all set up and turned on, one of the first things I
immediately
heard was a quite obvious humming noise coming from the backbox.
The humming is a low frequency hum which also accompanied a
higher
buzzing noise that increased and decreased in pattern with the
playfield
lighting in attract mode. At first
I thought I had a bad transformer, or possibly a faulty ballast for the
fluorescent light in the backbox. Well,
everything checked out ok. It
wasn’t until I happened to lean close to the backbox that I realized
the noise
was coming from the speakers. I
followed the wiring from the speakers to the backbox and saw connector
CN4 on
the left side of the CPU/Sound board. I
disconnected the connector and the game fell silent.
So I knew there was something in the sound circuit that was
causing the
humming and buzzing noise.
I called Stern and
talked to Chas whom is
their technical support person there and he explained to me what is
causing the
noise and how to fix it. I have
made the fix to my own pin and since it worked like he said, I thought
I would
pass it on to anyone interested in fixing their machine.
I know some people are purists about their machines and would
never
modify it in any way. If I had to
listen to that hum for one more day I would go crazy.
Chas stated that
there are two
portions that make up the amplification of the sound for the game.
The first is the digital portion which is the level you can
adjust via
the three buttons on the back of the coin door.
The second portion is the analog amplification and this is fixed
from the
factory. Since these pins are usually set
in noisy arcades, the analog
sound level is cranked way up to compete with all the ambient noise.
Since most of you who are reading this have them in your homes,
the sound
does not have to be up quite so loud. Straight
from the box, I had the digital volume set on level 1.
When I set the level to 2, it was too loud for other people in
the Family
Room. There was no fine adjustment
in between these two levels, so I was stuck.
Basically what this
repair does is turn down
the amplification of the analog circuit which will both eliminate the
buzzing
and give finer volume adjustments using the digital volume controls.
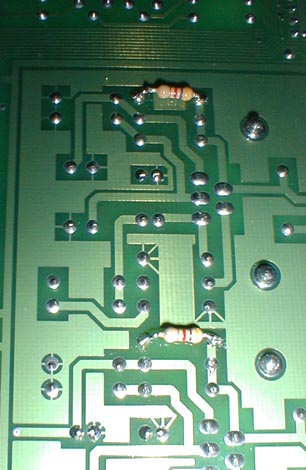
In your Monopoly manual
on page 125 there is
a schematic of the sound amplifier circuit. The right side of the
page
shows Speaker Outputs CN4 pins 1-7. Following pin 3 back is a 22K
Ohm
resistor R106. This controls the gain of the amp for backbox
speakers.
Similarly, back from pin 6 there is another 22K Ohm resistor R110
which
controls the amp gain for the cabinet speaker. What this fix will do is
reduce
the resistance value of these two resistors.
The lower the value, the lower the amplification.
But the next question is what combination of resistor values
works?
Well, this is where I have done the experimenting for you.
As it turns out a value between 3.8K Ohms and 4.7K Ohms works
perfectly.
Now, there are two ways
to change this
resistance. The first is to remove
both R106 and R110 an solder in a ¼ watt, 5%, resistor between
3.8K Ohms and
4.7K Ohms. But this seemed like too
much work and way too much room to screw something up on the CPU/Sound
board.
Not to mention that you would have to bend the resistor leads
push them
through the solder holes, providing you could clear the old solder out
first.
If you feel comfortable doing this, it will still work, but I
have an
easier method.
The second and easier
method involves adding
resistance in parallel to the existing 22K Ohm resistor effectively
reducing the
combined total resistance. The
formula for determining parallel resistance, that I use, is 1/R1 + 1/R2
= 1/Rt.
R1 is the 22K Ohm Resistor, R2 is the new resistor value that we
need to
add, and Rt is the total combined resistance of between 3.8K Ohms and
4.7K Ohms.
Without getting into all the algebra, Rt vales fall between 4.7K
Ohms and
6K Ohms respectively. So if we buy
a ¼ watt, 5% tolerance resistor between 4.7K Ohms and 6K Ohms
and solder it in
parallel to the existing resistors, we will accomplish the same thing
as
removing the existing resistor and only soldering in one.
Remember, the lower the resistance the less amplification. So the 4.7K Ohm resistor will reduce the
output volume more
than the 6K Ohm will. I had
originally soldered in a 1K Ohm resistor and had to crank the digital
volume to
max to get it loud enough.
In my machine I ended
up using a 4.7K Ohm,
¼ watt, 5% resistor I bought from Radio Shack which came in a 5
pack for .69
cents. We will be using only two
resistors, 1 to solder in parallel across R106 and 1 to solder in
parallel
across R110
Basically what you need
to do is unplug the
pin, remove the fluorescent lamp and remove the CPU/sound board from
the backbox
by removing all the connectors from around the edge of the board.
Be sure
you have dissipated any static in you body by touching the ground braid
that
runs all over the pin or some of the metal chassis of the game.
Loosen the screws and lift to remove the board. Find R106
and R110
located near the left center of the board. Flip the board over
and solder
1 of the 4.7K Ohm across existing resistor R106 and another 4.7K Ohm
resistor
across existing resistor R110 on the solder side of the board.
There is no
polarity to a resistor so you don’t need to worry which way the
resistor goes
in. Be
sure and then make sure again you are soldering across the correct
resistor!!!
Basically you should end up with a resistor in the same spot as
R106 and
R110 but on the solder side of the board. Be careful soldering
and trim
the excess leads before installing the board.
I was surprised to see other small components soldered to this
side of
the board as well from the factory!
Install the board,
tighten the mounting
screws and reconnect all the connectors around the edges of the board.
Remember to reinstall the fluorescent lamp and plug the game
back in.
It actually took me a half hour to perform this fix and all I
had was
some basic soldering skills.
When you turn the game on the buzzing is totally eliminated. You
will have
to turn up the digital volume of the game by using the left and then
the left
and center buttons behind the coin door to increase the digital volume.
After
the modification there is more flexibility in volume, I have it on 6
right now
and I can increase and decrease in much smaller increments.
And that’s it...total peace and quiet!
Personally, I think
Stern should change this
resistor value on their pin games. Even
with the analog amplifier turned down, you can still crank it up loud
enough
using the digital controls that it could be heard in an arcade.
Enjoy your Monopoly pin, and I hoped this helped some of you eliminate
that
annoying humming.
Mike Schudel
Photo Compliments of
Todd
George
Coloring bulbs
Regular bulbs work just fine colored with a Sharpie pen. A set of pens is 3-4 dollars or so, and you can color all the bulbs you need. I wish I could take credit for this, but I saw it posted on RGP.
Platinum Owners Chrome Saving (Compliments of Rob Fleischman)
A tip for Platinum Monopoly owners to preserve their chrome.
After getting my Platinum Monopoly, I noticed that the acid in the sweat from my hands was discoloring the chrome on the side and bottom rails. I fixed this by doing the following:
1. Removing the chrome side and bottom rails.
2. Polishing the rails with Noxon (or your favorite metal polish). It is *IMPORTANT* to make this fix before you've worn through your chrome. Otherwise, you will not be able to preserve the original condition.
3. Spray the rails with Clear coat. Spray cans can be obtained from your local auto parts store for $3-4 dollars. I used 2-3 thin coats. Clear coat is a great choice because it is commonly used to cover chromed automobile rims. Considering the excessive abuse auto rims take, the clear coated rails should last forever.
Additionally, it looks great!
-Rob
