Electronic Parts for your IJ

(or any other WMS machine of similar vintage)


THE BALL TROUGH

  1. Resistor
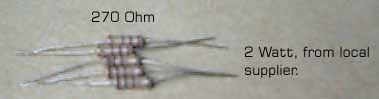
  2. The 270 ohm, 2Watt resistor is the most common part to replace (in my experience). I have been able to locate two sources for these parts:

    1) A local electronic shop carries 270 ohm 2Watt resistors.


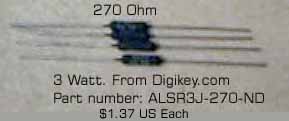
    2) An online electronic store Digikey carries 270 ohm 3Watt resistors.


    I am going to buy a large quantity of the 270 ohm Resistors from the local shop and resell them to other IJ owners who cannot find these parts anywhere else. Email me if your are interested in these. Since I have to buy a padded envelope and postage I plan on asking $2.00 US for the first resistor and $1.00 for each resistor after that (shipping charges are included in that price).


    You can compare my price verses the Digikey price of $1.37 I believe that Digikey has a minimum purchase that you must meet. I'm not sure the minimum order from Digikey, but you may find it easier to buy my resistors.


    Since both resistors are 270 ohm and at least 2 Watt, and physically small enough to fit, both resistors should work equally well.


  3. The infrared LED
  4. The infrared LED on the front-most circuitboard on the trough is the second most common electronic component to fail. Radio Shack carries this part in the left of the following photo:

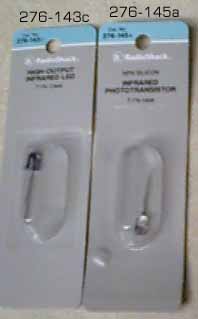
    This cost $1.69 US. It has a blue tint so it looks a little different than the Williams parts. I have tried this component in my ball trough and it appears to work fine. I have only briefly tested it and not done extensive tests. Preliminary tests seem to show that this LED works just fine as a replacement. Remember these parts are unidirectional and need to be installed with the flat edge lined up with the flat marking on the circuit board.

  5. The phototransistor

On the other circuitboard on the trough, there is an associated phototransistor for each LED on the front-most circuit board. This part doesn't fail a often as the others, but it might fail occasionally so here's some info on replacing it.


In the above photo of the Radio Shack LED, on the right is a Radio Shack Phototransistor, PN 276-145a. This part costs $0.99 US. This phototransistor looks considerably different from the original WMS phototransistors. It actually looks like a clear LED, but don't be fooled. I tried this Radio Shack phototransistor in mine briefly (for testing) and it appears to work okay. The flat edge of the phototransistor needs to be mounted closest to the top edge of the circuit board. That is, the flat edge of the phototransistor goes in the hole furthest away from the hole that has the little notch drawn by it on the circuit board.


An alternative to the Radio Shack phototransistor, I also purchased some from Digikey for testing. The Digikey phototransistors physically look much nicer. They have a gold base and a clear plastic tip. The first phototransistor pictured below has three pins. The pin in the middle needs to be cut as it is not used. Need to cut the third pin a close to the base as possible. I'm including these Digikey replacements for those of you who need to order parts on-line, you can buy them from Digikey. I didn't purchase any infrared LEDs from Digikey, but they should have an assortment and I can help you choose an appropriate one.


There are a couple different wavelength sizes and angle of visibility ratings. These need to be lined up so the little notch at the base of them lines up with the notch drawn on the circuit board. After a test of all three phototransistors that I purchased from Digikey, ONLY THE LEFT-MOST PHOTOTRANSISTOR WORKS in the IJ board. Apparently the other 2 are too sensitive to ambient light because they always showed the switch as a square indicating that it was receiving light. Only the left-most part PN104-ND worked and that is the one you should order. When installing this phototransistor you will need to remove the center pin from the part before installing. I just wiggled it back and forth until it broke off at the base.


Here's your options for acquiring these parts:

    1. Resistor: Order from Digikey or from Me.
    2. Infrared LED: Radio Shack, Digikey (I'll help you select an appropriate part from them), or you can even send me a few bucks and I can send you the RadioShack part if you have no other means of getting this part locally.
    3. Phototransistor: Radio Shack, Digikey (PN102-ND) or you can send me a few bucks and I can send you the Radio Shack part if you have no other means of getting this part locally.

Remember, Digikey has a minimum order amount that you must fill. You may find it easier to send me a few bucks and get the parts for you than order a bunch of extra unwanted parts from Digikey.

Here's a quick list of the parts that I've tested:

    1. RadioShack LED 276-143c with WMS factory phototransistor. Switch edges test work good.
    2. RadioShack LED 276-143c with RadioShack photransistor 276-145a. Works good.
    3. WMS factory LED with RadioShack phototransistor 276-145a. Works good.
    4. WMS factory LED with Digikey phototransistor PN104-ND. Works good.
    5. RadioShack LED 276-143c with Digikey photransistor PN104-ND. Works good.
    6. WMS factory LED with Digikey phototransistor LN51F-ND. Does NOT work.
    7. RadioShack LED 276-143c with Digikey phototransistor LN51F-ND. Does NOT work.
    8. WMS factory LED with Digikey phototransistor LN51L-ND. Does NOT work.
    9. Radioshack LED 276-143c with Digikey phototransistor LN51L-ND. Does NOT work.


THE PLAYFIELD OPTO SWITCHES

For playfield opto switches such as: left and right ramp entrances, MPF hole switches, idol head position sensors, idol head entrance switch, under playfield tunnel opto switches. For each of these switches there is an LED in the white plastic side and a phototransistor on the black plastic side. These opto switches should use the same LED and phototransistor parts as listed above for the ball trough boards. I have not tested the Radio Shack parts in these opto switches but they certainly should work. Email me if you are about to try to replace your bad opto parts with Radio Shack parts. I'll try to provide any assistance I can provide. Remember that these parts should be installed in a certain direction. We MAY find out that we have to replace BOTH the LED and the phototransistor with the Radio Shack replacements to get it to work since the Radio Shack parts are probably designed to work with each other (the frequency of the infrared light waves might be matched for both parts).


OTHER PLAYFIELD OPTO SWITCHES

For opto switches such as the drop-target sensors, flipper button sensors and mini-playfield limit sensors. These opto switches work exactly as all of the opto switches described above (an infrared sender, and a phototransistor receiver). The only difference is that the LED and phototransistor are physically enclosed in a single plastic U-shaped package. It's when something passes between the U, the switch is active. For example, there is a small flap of plastic on the drop-targets that pass through the U, or the mini-playfield limit uses a metal finger to pass between the U.


If you determine that you have a bad U-shaped opto part, you can first obtain a spare opto from your own machine! Indiana Jones shipped with 2 opto switches on each flipper button switch (the part where you actually press the flipper buttons... on the inside of the cabinet is the optos).


You can use the bottom-most opto for a spare as it is unused in Indiana Jones. These optos must be installed in a certain direction. There is a small notch at the base of this part which should line up with a notch drawn on the circuit board.


A second source might be Radio Shack. I believe that I saw this part when I was at Radio Shack. If you decide to try their part, let me know and I'll go and buy one to verify that it should work, and most importantly I can let you know the proper orientation if the Radio Shack part doesn't have that notch in the bottom of it for alignment.


ß Back to main page.

Google
 
Web pinballrebel.com